


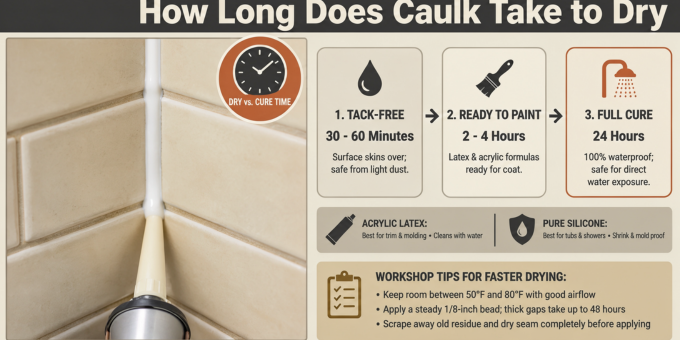
Fresh sealant can feel dry long before it is ready for water or heavy use. How long does caulk take to dry depends on its formula, thickness, temperature, and humidity. Most products become touch-dry within 30 minutes to several hours, while full curing often needs 24 hours or longer.
| Stage or Material | Typical Time | What It Means |
|---|---|---|
| Surface or touch dry | 30 minutes to 2 hours | The outer surface has formed a skin |
| Acrylic latex caulk | About 30 minutes to several hours | Often becomes paint-ready relatively quickly |
| Silicone caulk | About 30 minutes surface-dry | Many formulas need around 24 hours for full cure |
| Polyurethane caulk | Several hours or longer | Full curing may take several days |
| Water exposure | 30 minutes to 24+ hours | Depends heavily on the specific product |
| Full cure | About 24 hours to several days | The bead develops its intended strength and flexibility |
Quick answer: Most caulk becomes surface-dry within about 30 minutes to two hours. Full curing commonly needs at least 24 hours. Silicone, acrylic, and polyurethane products have different timelines. Always follow the product label before painting, showering, cleaning, or exposing a fresh bead to water.
Drying and Curing Are Not the Same Thing
Drying describes what happens near the surface of the material. The outside may form a skin that no longer feels sticky. That does not mean the entire bead has reached full strength.
Curing happens throughout the applied material and usually takes much longer. A cured bead has developed its expected flexibility, adhesion, and water resistance. Premature use can disturb the seal even when the surface feels dry.
This distinction matters most in bathrooms, kitchens, and exterior joints. Water can damage some products before their recommended exposure time. Waiting for the proper stage protects both the seal and surrounding materials.
How Long Does Caulk Take to Dry by Type?
Different formulas cure through different chemical or evaporation processes. Product labels therefore provide more useful guidance than one universal waiting period. The following ranges work as planning estimates, not replacements for manufacturer instructions.
Silicone Sealant
Silicone commonly becomes tack-free within about 30 minutes under suitable conditions. Many common household formulas list a full cure near 24 hours. Thick beads, cold rooms, or unsuitable humidity can extend that period.
GE Sealants lists a 30-minute tack-free period and a 24-hour cure for several silicone products. Those figures are based on specified temperature and humidity conditions. The company also notes that bead depth and environmental conditions affect the timing.
Some newer bathroom formulas can withstand water much sooner than 24 hours. GE states that certain products can become water-resistant in 30 minutes under specified conditions. That water-ready claim does not mean the material has completely cured.
Acrylic Latex Sealant
Acrylic latex products are common around trim, baseboards, doors, and painted joints. Their surfaces can dry within 30 minutes to several hours. Many formulas can also accept latex paint before reaching a complete cure.
For example, GE’s siliconized acrylic window and door product allows latex painting after 30 minutes. The same product recommends waiting at least 24 hours before water exposure. This difference shows why paint-ready and water-ready times should not be confused.
Acrylic formulas depend heavily on water evaporation. High humidity can slow that process because moisture leaves the material more slowly. Good airflow and moderate indoor temperatures usually create better drying conditions.
Polyurethane Sealant
Polyurethane products are often selected for exterior joints and demanding construction applications. They usually need more curing time than many household acrylic products. Deep joints can require several days before reaching full service strength.
The exact timeline varies widely between manufacturers and formulations. Temperature, humidity, joint depth, and substrate conditions can change performance. Check the technical data sheet before exposing the joint to rain or movement.
For wider renovation work, planning drying periods alongside other tasks can prevent delays. Mindspaper’s guide to planning home upgrades and maintenance explains why sequencing household projects matters.
How Long Should You Wait Before Showering?
A bathroom bead must withstand direct water, cleaning products, and regular temperature changes. Its surface may look finished long before it is ready for those conditions. The safest shower wait comes from the exact cartridge instructions.
Some advanced silicone products advertise water readiness after only 30 minutes. Other formulas recommend eight, twelve, twenty-four, or more hours before water contact. Conditions attached to fast claims may include minimum temperature, humidity, and maximum bead thickness.
When the label is unclear, giving the joint a full 24 hours is a cautious approach. Longer may be appropriate for thick applications or cool rooms. Avoid touching, scrubbing, or soaking the bead while it continues curing.
Bathroom projects often involve grout as well as flexible sealants. Mindspaper’s guide on how long grout takes to dry can help coordinate both waiting periods. Treat each material according to its own instructions.
How Long Before You Can Paint It?
Paintable acrylic products often become ready much sooner than waterproof bathroom materials. Some fast-dry formulas permit latex paint within 30 minutes. Others require two to four hours or longer.
Never assume that every sealant can accept paint. Traditional 100% silicone is generally not paintable because standard paint does not bond properly. Check the cartridge for a clear paintable designation before applying a coating.
Oil-based paints can also require a longer waiting period. GE recommends 24 hours before oil-based paint on some acrylic products. Latex paint may be allowed far sooner on the same formula.
If painting is part of a larger renovation, finish wet or messy work in the proper order. Mindspaper’s article about preparing for a major home update offers additional project-planning guidance. A simple schedule can prevent fresh finishes from being disturbed.
What Changes the Drying Time?
Several conditions can move the timeline away from the number printed on a general chart. The material’s chemistry remains the biggest factor. Application conditions then determine whether it cures near the expected rate.
- Bead thickness: A deeper or wider bead generally needs more curing time.
- Temperature: Cold conditions often slow chemical reactions and evaporation.
- Humidity: Moisture can affect silicone and water-based acrylic formulas differently.
- Airflow: Moderate ventilation helps some water-based materials release moisture.
- Surface condition: Dirty, damp, or oily surfaces can weaken adhesion.
- Product age: Old or improperly stored material may not perform as expected.
- Joint depth: Deep gaps can remain uncured below a dry-looking surface.
Humidity deserves extra attention because different formulas respond differently. Silicone commonly cures through reactions involving atmospheric moisture. Water-based acrylic products need moisture to leave the bead.
Homes in humid climates can therefore require more careful timing and ventilation. Mindspaper’s guide to home upgrades for humid regions covers broader moisture-management concerns. Controlling indoor conditions can make renovation work more predictable.
Can You Make Sealant Dry Faster?
You can create favorable curing conditions, but aggressive shortcuts can cause problems. Start by applying the product within its recommended temperature range. Keep the bead close to the dimensions specified by its manufacturer.
Provide normal airflow when the product benefits from ventilation. Avoid blasting the fresh joint with a heat gun or high-temperature heater. Excessive heat may cause uneven skin formation or damage nearby finishes.
Do not mix chemicals into the material unless the manufacturer specifically approves them. A rushed seal can fail sooner and create more repair work. Choosing a fast-curing product before starting is safer than forcing a standard formula afterward.
How Can You Tell When It Is Ready?
A dry-looking surface alone is not enough evidence of a full cure. The bead may become tack-free while remaining soft underneath. Product instructions remain the most reliable timing reference.
Avoid pressing, scratching, or repeatedly touching the surface to test it. Those actions can deform material that has not finished setting. Instead, record the application time and follow the manufacturer’s stated waiting period.
You should also check which milestone matters for your project. Paint-ready, rain-ready, water-ready, and fully cured describe different stages. Using the correct milestone prevents unnecessary waiting and premature exposure.
What Happens If It Gets Wet Too Soon?
Early water exposure can interfere with adhesion or wash away water-sensitive products. The surface may wrinkle, soften, separate, or develop weak spots. Problems may appear immediately or become visible after repeated use.
If the joint looks damaged after getting wet, let the area dry completely. Check for lifting, gaps, softness, or poor bonding along both edges. Failed sections usually need removal and fresh application.
Leaks around sinks, tubs, and plumbing fixtures deserve prompt attention. Mindspaper’s plumbing installation guide explains how proper sealing supports a reliable plumbing system. Water intrusion can damage nearby finishes when joints remain unprotected.
Common Timing Mistakes to Avoid
The most common mistake is treating touch-dry as fully cured. A surface skin develops before the material underneath reaches its final condition. That visual change can create false confidence.
Another mistake is applying an oversized bead to fill a deep opening. Thick applications can extend cure time and may perform poorly without proper joint design. Backer rod may be appropriate for larger gaps when the product manufacturer recommends it.
Skipping the label is another preventable problem. Two products sold for similar jobs can have different water-ready times. Reading the cartridge before starting can save an entire day of uncertainty.
Give the Joint Enough Time
Drying time is only one part of a successful sealing job. The material must also reach the right stage before paint, water, cleaning, or heavy use. A dry surface does not guarantee a completely cured joint.
Plan around the specific product rather than a universal 24-hour rule. Read its water-ready, paint-ready, and cure instructions before starting. That small step helps prevent peeling, weak adhesion, and avoidable rework.
For bathroom or renovation projects, coordinate sealant timing with grout, plumbing, paint, and other materials. That approach keeps the job moving without rushing fresh work. When in doubt, allow more curing time and follow the manufacturer’s instructions.
Frequently Asked Questions
How long does caulk take to dry completely?
Most household products need about 24 hours to reach a typical full-cure milestone. Some specialty materials require several days, especially in deep joints. Always use the manufacturer’s cure time for the specific formula you purchased.
Can I shower 12 hours after applying silicone?
Possibly, but the answer depends on the product. Some silicone formulas allow water much sooner, while others require 24 hours. Follow the water-ready instructions printed on your cartridge rather than relying on appearance.
Is silicone dry after two hours?
It may be surface-dry after two hours. That does not mean the bead has cured throughout its depth. Many household silicone products specify approximately 24 hours for complete curing.
Can I paint sealant after one hour?
Some paintable acrylic formulas allow latex paint after 30 minutes or one hour. Other products need several hours before painting. Pure silicone usually should not be painted unless the manufacturer specifically says otherwise.
Why is my sealant still sticky after 24 hours?
Low temperatures, unsuitable humidity, thick application, or an old product can delay curing. Contamination on the surface can also affect performance. Check the label and allow additional time before deciding that the application has failed.